Pages

Wednesday 31 August 2011

Meeting the lovely Sarah Ruppin from Rehab Vintage

Hasn't the world become a small place! And by small I mean micro-scopic. We have the Internet to thank for that. Over the last year I have met some truly wonderful people from all over the world, be it via this little blogging world of mine, the fabulous photo sharing sphere that is Flikr, or the ever-growing tweeting world of Twitter. Not so long ago I started chatting to Sarah Ruppin, the lady that is at the helm of the very stylish Rehab Vintage, an on-line shop that sells some fabulous vintage/retro clothing and accessories. I visited her pop-up shop at Burwash Manor in Cambridgeshire in June, and just fell in love with all the gorgeous garments she had on offer. And meeting the lovely lady herself gave me the idea to introduce you to her, if you haven't yet had the pleasure of meeting her!

When I first met Sarah, she helped me out with a fashion challenge I had to do for Essentials magazine for Women. I had the pleasure of obtaining this wonderful, quirky dress from her. I just fell in love with it, and teamed it up with a scarf which came from her collection also. Thank you Sarah!


A little bit about the lovely lady herself now! I asked Sarah a few questions, as I'm always interested in the person behind the great idea.
How did Rehab Vintage come about?
I have always had a passion for the fashion of the 1980's, which over time has developed into a wider interest in vintage styles from different era's. I used to be a window dresser for H&M, and I think that being a stylist has helped my eye develop for certain things which appeal to me. What started out as a hobby, and selling at Camden Market, has now developed into my own on-line shop. I have also started selling at Cambridge Market.
What are you most passionate about in life?
I'm the very proud mum of one, and my little boy is my biggest passion right now! I love him to bits! But, professionally speaking, I'm very passionate about fashion, jewelry (and yes, she does have quite a collection of fabulous proportions!), furniture, and of course my favourite era which is still the 1980's. My tastes are quite eclectic.
Who inspires you in life?
Hands down, I can say that my dad is my greatest inspiration. He came to the UK at the age of seven as a refugee from Germany, and managed to make a life for himself here, against the odds. This determination in him is what inspires me to follow my dreams. Of course a girl has to have some style icons too, and mine are the very beautiful and talented Chloe Sevigny, Fearne Cotton and Jame Winstone. I love their style and attitude towards fashion and individuality.
Where do you see yourself in five years from now?
My ultimate goal is first and foremost to be a good mum. I would love to also see myself in a bricks and mortar shop one day, where I can truly develop and share my passion for vintage and retro fashion with customers face to face. I adore clothes and styles from several different era's, and tend to gravitate towards the more quirky and unusual spectrum of these era's. I like things that are different, and think that different is good!

Well, I can't help but agree with Sarah. I have always believed that I can wear what makes me happy, what makes me feel good, even if it means bucking the trends! Individuality, like variety, is the spice of life! If you are looking for that one-off, special something to add to your wardrobe, I would urge you to have a look at Sarah's website, http://www.rehab-vintage.co.uk/, and grab yourself a piece of unique and beautiful vintage fashion history! And, if you happen to be frequenting the streets of Cambridge, why not pop by and say 'hello' to Sarah in person. You will find her in the Cambridge Market Square by the Guildhall on Mondays and Fridays where she runs her stall. Rehab Vintage also teams up with Jemporium to present 'The Vintage Basement' @ the Cow Pizza Kitchen and Bar, on the last Saturday of the month, 12-5. (Postcode: CB2 3QF) Here you will find affordable vintage clothing for guys and girls, so don't miss out!

I'd like to say a very big thank you to Sarah Ruppin, for letting me into her shop shed, and for sharing her style, inspiration and time with us. It has been a pleasure to meet with her, and I look forward to seeing what's going to come from this delightful shop!

Friday 26 August 2011

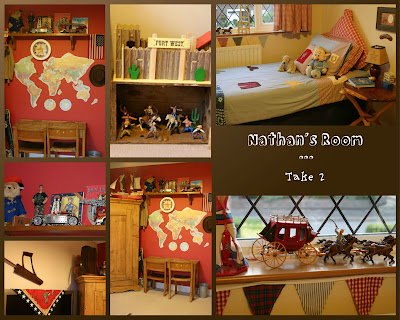
Nathan's Cowboy room: Take 2

Boy oh boy...how hard can it be to re-style a room? Well, if the room happens to be inhabited by a boy, and it happens to be at the mercy of this mommy to give it a make-over, it's definitely in trouble! Those of you who know me personally will know that I can do frills and pink, and girly is something that is second nature to me. But, when I have to think 'frogs and snails, and puppy dog's tails', I'm challenged to the outer limits of my thinking! I found myself pulling my hair out trying to come up with a fresh take on my seven year old son's room, after having done my daughter's room. Things were looking a bit tired in both rooms, so I decided to freshen it up a bit. Getting in touch with my inner child is never hard, but when that child is a boy, it doesn't come easy!

Nathan has had a cowboy themed room for quite some time now, and I thought a change might be good. However, when you're sentimental like I am, it's not always easy to live by the mentality of 'out with the old, in with the new'. After much consideration, I decided to keep things simple and sensible, as a major change would mean spending quite a few pennies. And in a year or two he's bound to want to change things again. So, the decision was to turn his cowboy room into an explorer/adventurer's room by adding a few new touches to compliment what was already there.

The first thing I did was to simply move his furniture around. This has made a big difference, as the whole perspective has changed. We had a good old clear out, and added some finishing touches. My favourite must be his 'map of the world' wall. I found a very large map in a stationary shop for very little money.  At first I was merely going to stick it to the wall with Blu-tack (Prestik to some of you!), but it was too big and heavy and kept pulling away from the wall. So, armed with some scissors and diluted PVA glue, I set to work. And the result.....A map wallpaper mural!


I added some string and pins to create a 'flight path', and a little aeroplane which cheered up the wall nicely. Pictures can be a very inexpensive way of injecting a new flavour into an existing theme.

I'm always thinking of ways to recycle and re-use things I already have. So, when I looked through Nathan's book collection, I found an illustration in an old fifties publication of Roy Rogers, and thought it should be framed. Now, I'm not advocating that you treat precious old books like a stack of magazines in a doctor's surgery where no one cares what happens to them! This page was hanging by a thread as the book is very old, and I thought it needed to be preserved in a frame!


I also found an old frame in a cupboard, and used some transfers to make a picture. I like grouping frames with other objects when putting them up on walls. I think it adds more interest to the ensemble. What do you think?


Well, with very little effort, Nathan's room has had a bit of a face lift, albeit just a bit of Botox and not a whole nip and tuck! But, he is very pleased with the result. I'll leave you with a few pictures of the room as it stands now.
I hope you all have a fun-filled, rest full weekend! We're off to visit some dear friends in the beautiful garden of England that is Kent. I would love to hear from you, and what you've all been up to lately, so do leave a comment. Bye-bye for now!

Monday 22 August 2011

Lauren's tree

Have you all had a good weekend? Over here it has been like living in a beehive, with lots of hard work getting done, but also savouring some sweet honey in the form of quality family time! We've been swimming, walking, cycling and debating. Yes, there is always some form of live debate going on in our house! I tell you, you spend the first two years teaching your little darlings to speak, and when they truly get the hang of it, you start telling them to keep quiet! I don't know what it's like in your house, but I sometimes feel like I live in a cattle market. But, they're not to blame, after all, I'm a bit like a foghorn....very loud! Well, enough about that. I've been beavering away this weekend, and I'd like to show you the fruits of my labour! I'm on a bit of a roll with the old to-do-list, and I'm slowly ticking off all the projects that have been brewing in my mind for a l-o-n-g time. Following the playhouse make-over, I decided to tackle the kids' rooms next, starting with my daughter's room.

For months now I've wanted to try my hand at painting a tree mural in Lauren's room. At one point I thought I might just buy one of the many lovely wall stickers that are on the market right now...much easier to stick something on the wall than to paint it! But, the cheap skate side of me always wins, and I decided to use what I already had. I used some tester pots of paint, and set to work, and the tree is done!


OK, so I'm no Picasso, but I'm pleased with the end result. And more importantly, Lauren loves it! I really wanted to paint an owl, but I opted for some decoupage instead, and used some scrapbooking papers that I had stashed away. Some butterflies cut out with my old trusty Big Shot, and I was nearly done. Just one more thing...I wanted to add a bird box to the tree mural, but again, wanted to be thrifty in doing so. I used a recycled box that I picked up from a local shop's rubbish pile, and refashioned it into a bird box. The cost: Totally free, and it was a labour of love.


After a good tidy and clear out, Lauren's room has had a mini make-over, and she is delighted. She now has a big girl desk in her room, and is all set for going up a year in school. I'm hoping for many productive hours spent here!


No room make-over is complete without finishing touches. Re-using items you already have in a new and fresh way, not only saves pennies, but can be very satisfying. Last year a made a little bird for Lauren's birthday, and only now does it have pride of place in the tree!


I found the lampshade in a thrift shop a while back. I cut off the existing tassels, and made a new trimming with some fabric. I made the rose and hot glued it on the shade, and voila, a new lamp!

I loved the pink stripes in this sheet when I picked it up in a charity shop. I cut it in half and made a "window dressing" to frame Lauren's dressing table.


One of my favourite things in the whole world to use, is transfers. You can jazz up just about anything, and it always looks like you put in a lot more effort than you did! Teamed up with some metal door jewelry that I bought from Greenwich market many years ago, I added some words of inspiration to the wall. Finally, these little frames are being used. I never knew what to do with them!

So, one room is done, two more to go! Hope you've enjoyed this little tour.


Next week I will be featuring the lovely Sarah Ruppin from Rehab Vintage...very exciting! Keep an eye out, as I'm sure you'll enjoy meeting her as much as I did. Have a very happy, blessed day!


Tuesday 16 August 2011

Sew a little love: Playing 'House'

Sew a little love: Playing 'House': "For such a long time now I've been wanting to give the kidlets' playhouse a makeover. Daddy built it a couple of years ago, and over the yea..."

Playing 'House'

For such a long time now I've been wanting to give the kidlets' playhouse a makeover. Daddy built it a couple of years ago, and over the years it has faded to a pale, weathered grey, not the best site to stare at as you look out of the window. Every time I washed the dishes, I'd sigh and mentally add it to the very long to-do list that grows at the rate of Jack's beanstalk! Last summer I kept putting it off by another week, and only now, a whole year later, has it been given a new lease of life. As I'm like an overly excited puppy with a new Louboutin shoe, I can't help but share it with you! It might help to show you  a 'before' picture, but I failed miserably to get the camera out to take a shot. I'll share an older picture with you instead, baring in mind it was taken a couple of years ago when 'The Little House' was still quite new and cheery!

As you can see, it was lacking in imagination a bit, and needed some TLC. Firstly, it needed some colour. Hubby kindly donned the painting gloves, and we decided a lovely Forget-me-not blue would suffice. After adding some white trimmings, it looked a lot fresher.


And the result....Ta-da!


To turn our little house in to a home, we needed some finishing touches of course! I sewed some patchwork curtains to add summer cheer, along with some bunting. The little bench that sits alongside it, also got a lick of paint. The kids were itching to get their fingers dirty, so they had the job of painting furniture. It was so much fun, and they did a brilliant job! However, if someone had to look at our back garden via Google Earth, there is no doubt that they would think we've acquired a swimming pool, as the garden is still covered in blue paint!


Of course every house needs a house name, so we decided to stick with 'The Little House'. I made a housname plaque for it, as well as a fire bucket. If you know my two year old, you would know it definitely needs it! Here are some pictures of all the finishing touches.


Ooh, just one more thing I have to share! A little while ago a dear friend turned up with a present for our little man, a red radioflyer trike that she had found in a thrift shop. Thank you Dianne! Isn't it gorgeous?

Well, I think there will be a lot of playing, dreaming, tea partying and imagining going on, and that's just me! I hope you've enjoyed our little trip 'playing house'...Now, time to grapple with the chores of a real house...Until next time!


Monday 1 August 2011

Romantic Jewelry Pinboard Tutorial

So, do you also have a jumble of knotted jewelry in a box somewhere that drives you potty? As a result you don't wear half the jewelry you own because you could probably walk to France and back in the time it would take you to un-knot it all? I have quite a selection of brooches, and found that I only ever wore a few because they were in an uninspiring mess! Well, a while back I decided to have a good tidy and to organize my bling in such a way that I could actually SEE it all. Today I'd like to share a little 5 minute project with you, which helped me to get organized! I made this jewelry pinboard a while back, and it hangs inside my wardrobe door. It is so easy now to accessorize an outfit.


To make a jewelry pinboard, all you need is of course a cork pinboard. They come in a variety of sizes, but I've gone for a small one to fit inside my wardrobe door. You'll also need wadding, fabric of your choice, a staple gun and lace or any other trimmings if you like. The sky's the limit as to what the finished product can look like. I've gone for a romantic look, so I used some plain pink fabric (recycled sheet!) and lace. Finally, you'll need some pretty pins. Bridal pins are best as they're longer, and will hold jewelry securely.


Method:
  • Cut the wadding to the exact size of your pinboard, and layer it on top.
  • Cut your chosen fabric about two inches/5cm larger than your board, and layer it on top of the wadding.
  • Now pull the fabric tight round the back of your pinboard, and staple it in place. It's best to staple it to the wooden frame as opposed to the cork, as this gives a more secure finish.


  • Add lace over the fabric if you're using any, and staple in place.
  • Voila! Ready to arrange your jewelry on top!

These pinboards are great for hanging necklaces, attaching brooches, or even hair accessories. Anything goes, so you can have a lot of fun with it! I'd love to hear about your ideas for organizing jewelry better, and if you happen to have a go at making a pinboard, do share some pictures. I'd love to see them!